In “Practical Ubuntu — Part 1 of 2” we installed Ubuntu Oneiric Ocelot on an HP 6910p notebook alongside the existing Microsoft Windows Vista, set the administrator “root” login to a password we know, added openssh-server so we can work on it remotely instead of needing to stand right there beside the computer while updating it, and ran the automagic update routine “apt-get dist-upgrade” to update all the software to the current versions.
In this module we want to install the Google Chromium Web Browser, the Compiz Zoom feature so we can magnify any section of the screen in class for demonstration purposes, the GNOME Desktop in case Unity is not wanted for some reason, and the VMWare Player module so we can teach multiple OSs without needing to reboot every time. We will also create a simple Virtual Machine (VM) using an open source DOS-like Operating System: follow the same steps to install whatever system is needed on each VM. Pay attention to license terms if you use proprietary software.
Chromium Web Browser
Google Chrome (and the related Ubuntu version Chromium) are currently the leading competitor to Microsoft Internet Explorer. It has certain very nice features, such as all the most popular codecs and flash are included already thus you don’t need to install or maintain them as an extra step. This means that after installing Chromium you can simply browse to web sites that use flash and it will work and it will never need “a newer version of flash that is available”. Chromium also has a very nice method of protecting the user from cross-site scripting attacks by leaving javascript off for unknown sites and turning it on when desired by clicking a single icon that appears in the URL address bar.
The easiest way to install “Ubuntu supported” software is to just use the Ubuntu Software Center and click.
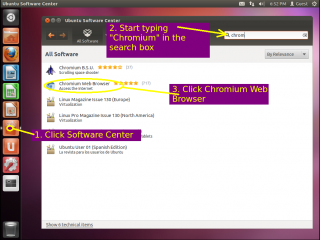
The other way to do this is to know in advance that the package name for the chromium browser is “chromium-browser” and install it from the command line with “apt-get install chromium-browser”. Either works.
root@dad:~# apt-get install chromium-browser
Reading package lists… Done
Building dependency tree
Reading state information… Done
The following packages were automatically installed and are no longer required:
linux-headers-3.0.0-15 linux-headers-3.0.0-15-generic
Use ‘apt-get autoremove’ to remove them.
The following extra packages will be installed:
chromium-browser-l10n chromium-codecs-ffmpeg libnss3-1d libxss1
The following NEW packages will be installed:
chromium-browser chromium-browser-l10n chromium-codecs-ffmpeg libnss3-1d
libxss1
0 upgraded, 5 newly installed, 0 to remove and 0 not upgraded.
Need to get 21.7 MB of archives.
After this operation, 86.8 MB of additional disk space will be used.
Do you want to continue [Y/n]?
Install Compiz
One of the problems we reported after installing Ubuntu 11.04 “Natty Narwhal” is that the Zoom feature stopped working. We use zoom daily in teaching as it allows us to magnify content on the five foot monitors at the front of our classroom so that students can see the small items, such as menu selections, and follow what we are instructing them to do. The loss of the ability to zoom would mean the students would have to get up out of their seats and walk to the front of the room. We discussed this for Ubuntu 11.04 “Natty Narwhal” in a previous article.
The easiest way to install compiz is to use the Ubuntu Software Center, type compiz in the search box, and click the package when it comes up.
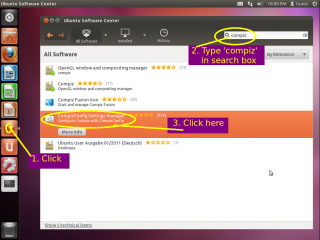
Alternatively you can install from the command line with “apt-get install compizconfig-settings-manager”
root@dad:~# apt-get install compizconfig-settings-manager
Reading package lists… Done
Building dependency tree
Reading state information… Done
The following packages were automatically installed and are no longer required:
linux-headers-3.0.0-15 linux-headers-3.0.0-15-generic
Use ‘apt-get autoremove’ to remove them.
The following extra packages will be installed:
compiz-plugins compiz-plugins-main python-central python-compizconfig
The following NEW packages will be installed:
compiz-plugins compiz-plugins-main compizconfig-settings-manager
python-central python-compizconfig
0 upgraded, 5 newly installed, 0 to remove and 0 not upgraded.
Need to get 2,862 kB of archives.
After this operation, 12.2 MB of additional disk space will be used.
Do you want to continue [Y/n]?
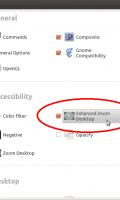
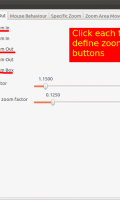
To make this work, you must enter the command CCSM in terminal or in the little catchall area at the top of the launcher bar — the place where all the programs NOT on the launcher bar can be found. The settings I used are:
Zoom in: <Super>Button4
Zoom out: <Super>Button5
Zoom box: <Super>Button2
 |
 |
 |
| Click each image to see larger picture. | ||
For more information on this feature you can browse the askubuntu.com library at http://askubuntu.com/questions/36751/how-to-activate-superscroll-to-zoom. You can get most of the Zoom functionality in Unity. Go to the on/off symbol at top right, click System settings, then click CompizConfigSettings Manager. Under Accessibility find Enhanced Zoom Desktop, enable it, and set the Zoom In and Out as stated above. Zoom now works everywhere except the launcher bar on the left. Zoom will not work in the Unity 2D session — it must be a full Unity session.
I have seen cases where, even though this worked for us here, it still didn’t work. The best suggestion I can offer is to be sure you have updated all packages to their latest version as I also noted this did not work initially, and it magically started working after a few months (and updates).
Some notes on using the Unity launcher bar.
To put a program, such a Chromium, on it run the program, and while it is still running you will see an icon representing it in the Unity launcher bar. Right Click that icon and from the pop-up menu select “Keep in Launcher”. After that there will be a button in the launcher which you can click to start the program.
To re-arrange the order of icons on the launcher bar is easy but non-intuitive. Click and hold the icon that you want to move, then 1. drag it off the launcher bar to the right but don’t let go, 2. drag it up or down to where you want it, 3. drag it left back onto the launcher bar, and then 4. let go. You can’t just drag straight up or down — that moves the bar. Drag the icon off to the right, up to where you want it, and back onto the bar.
In Case Unity brings Division…
You can install the classical GNOME session interface if you so desire and select it at the time you are loging in. There is a gear or star icon next to the login name box: you click that gear and then click the kind of session that you want. To install the GNOME session run the command “apt-get install gnome-session-fallback”.
root@dad:~# apt-get install gnome-session-fallback
Reading package lists… Done
Building dependency tree
Reading state information… Done
The following packages were automatically installed and are no longer required:
linux-headers-3.0.0-15 linux-headers-3.0.0-15-generic
Use ‘apt-get autoremove’ to remove them.
The following extra packages will be installed:
alacarte gir1.2-panelapplet-4.0 gnome-applets gnome-applets-data gnome-panel
gnome-panel-data libpanel-applet-4-0 python-gmenu
Suggested packages:
gnome-netstatus-applet deskbar-applet cpufrequtils evolution
epiphany-browser desktop-base
The following NEW packages will be installed:
alacarte gir1.2-panelapplet-4.0 gnome-applets gnome-applets-data gnome-panel
gnome-panel-data gnome-session-fallback libpanel-applet-4-0 python-gmenu
0 upgraded, 9 newly installed, 0 to remove and 0 not upgraded.
Need to get 9,486 kB of archives.
After this operation, 40.3 MB of additional disk space will be used.
Do you want to continue [Y/n]?
A reboot is required before it will take effect. You can also install “apt-get install gnome-shell” for another session format, which I personally feel is rather nice. Another good article on this is available at http://www.makeuseof.com/tag/easily-install-gnome-shell-ubuntu-1110-newer-linux/. Another tip on the session interface: using the Gnome task bar at top of the screen you use ALT-right click now to move things.
VMWare Player
The steps above solved most of our issues for Oneiric Oscelot. The only remaining significant issue is installing VMWare Player so that we can quickly demonstrate the same job skill / principal across several popular environments. In our case we buy volume licensing for several Microsoft products, including Windows XP, Vista, and Windows 7. We demonstrate using these in class together with Ubuntu Linux because any of these systems could be encountered by a job applicant seeking work. To do this effectively we install one of our licenses in each virtual machine and we can then use that VM under Linux to demo the skill in Windows. This is not quite as nice as having three separate computers all hooked up to the projector, but it is a very good compromise, and together with the Zoom feature it seems to get the job done.
To get the VMWare Player software, you must go to the VMWare.com web site and log in. Player is free but they require you to agree to terms. On vmware.com go to Products, then Desktop Virtualization Products, then on the right vertical nav bar click VMWare Player. At the top left, click the big blue DOWNLOAD button. There will be a table with the links to click to download: you may need to scroll down to see it. Click Download again, login to your VMWare account or create an account, and on the next page click on the link to download the binary for the VMWare Player version that fits your computer. The download on my notebook if a FiOS 5/2 (5MHz download, 2MHz upload) connection required on the order of ten (10) minutes.
In your download folder, find the file: it will be one big script. It was 129.7MB when I downloaded it. Make the file executable (right click, permissions, check the execute box). Open a terminal window with CTRL-ALT-T and shell to root. Run that script to install the VMWare Player.
Welcome to Ubuntu 11.10 (GNU/Linux 3.0.0-16-generic x86_64)
* Documentation: https://help.ubuntu.com/
Last login: Sat Feb 18 18:23:43 2012 from pops.local
jdnash@dad:~$ su –
Password:
root@dad:~# cd /home/jdnash/Downloads/
root@dad:/home/jdnash/Downloads# ls
VMware-Player-4.0.2-591240.x86_64.txt
root@dad:/home/jdnash/Downloads# ./VMware-Player-4.0.2-591240.x86_64.txt
You must agree to their EULA to install, so answer the prompts in terminal as they appear, and eventually it will be installed. Items in [brackets] at the prompts indicate that is the default answer — you just press ENTER to accept it. For the EULA you must type “yes” but otherwise ENTER will do. If you don’t know, you run a script such as this by typing “./” followed by the file name. You may press the tab key to help — if you start off the name of the file and press the TAB key, then Linux will try to figure out which file you want and type the rest of the file name for you. For example, in the terminal windows shown below I only needed to type “./VM” and then I pressed TAB: the system could see only one executable file which started with the letters “VM” so it typed the rest of the name for me “ware-Player-4.0.2-591240.x86_64.txt”. Very convenient.
root@dad:/home/jdnash/Downloads# ./VMware-Player-4.0.2-591240.x86_64.txt
Extracting VMware Installer…done.
You must accept the VMware OVF Tool component for Linux End User
License Agreement to continue. Press Enter to proceed.
VMWARE
…….Do you agree? [yes/no]: yes
Would you like to check for product updates on startup? [yes]:
Would you like to help make VMware software better by sending
anonymous system data and usage statistics to VMware? [yes]:The product is ready to be installed. Press Enter to begin
installation or Ctrl-C to cancel.Installing VMware Player 4.0.2
Configuring…
[######################################################################] 100%
Installation was successful.
root@dad:/home/jdnash/Downloads#
To run VMWare Player, use the little black square at the top of the floating launcher bar (Dash Home) and type VM into the search box. You will see VMWare Player under the Installed Apps. Click it, accept the EULA (again), and the main VMWare Player screen is before you with no virtual machines in it (yet). Next we will create a VM. You can keep an icon for VMWare Player in the Unity launcher bar by right clicking its icon now and checking “Keep in Launcher”. In the old (GNOME) menu it used to be under Applications / System Tools.

Making a Virtual Machine under VMWare Player
Before we make a VM, we need to install CD or DVD, or an .iso file which contains the install. In this document we will use the open source program Free DOS which is a Linux based DOS clone. You can download it from http://www.freedos.org/. It is a small file, under 40MB and downloaded in 1-2 seconds. The filename when I downloaded it for this document was “fd11src.iso”. If you are installing VMs from other CDs, you can insert the CD or DVD into your Linux computer’s CD/DVD reader and when the drive opens up close the window, then right click on the associated icon on your desktop and select “Copy Disk”. Copy it to an image file instead of to another CD/DVD. You now have the necessary electronic .iso file to use for installation. You can install from a physical CD, but electronic is much faster. I made the statement before, but I will repeat it again here: be sure you have proper proof of the right to use the software if you are installing proprietary software. This is not a problem for Open Source.
There are many pre-made VMWare “appliances” available for download from the VMWare.com web site. To use one of them, download it, then in VMWare Player click File, Open Virtual Machine and browse to the VM Appliance. In the following exercise we will make our own Free DOS VM.
Start the VMWare Player. Click Create a New Virtual Machine. Click the Radio Button for Installer Disk Image File and browse to the file. Follow the rest of the prompts. Done.

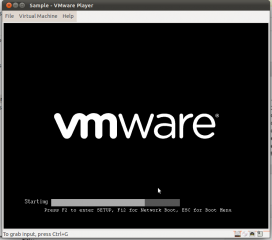
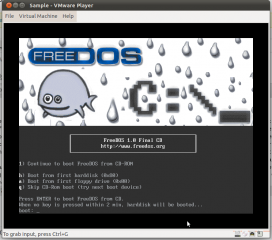
Click “Play virtual machine” to run the VM and watch it install your OS.
 |
 |
| Click image to see larger picture. | |
1 thought on “Practical Ubuntu — Part 2 of 2”
Comments are closed.