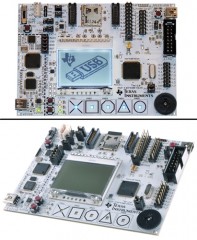
 There is a wonderful technology spring right now, with many different microcontrollers available for very little money — on the order of $2 each. Kits already working and ready to plug into your personal computer’s USB jack and free programming software and tutorials abound. Arduino and TI both have programming tools based on the Wiring project, somewhat modded.
One of the most popular is the early Italian microcontroller, the “Strong Man” or “Arduino”, which is  about $25. If one connects LEDs to each of the available digital outputs one can program the controller to light the LEDS like the light bar on Kit from Night Rider – a glowing red bar that moved slowly back and forth staring down criminals. If you never watched Night Rider stay with me here.
This is a program I use to provide this trivial purpose: if you have your wires connected right and  nothing is shorting out, then you see it immediately, and if you have a problem usually you can see that immediately also, thus the value of the program to verify your hardware setup before you get down to serious programming.
It is written in pidgin C using the free text editor / chip programmer software that came with Arduino.
/*
Program:Knight_Rider_Digital_Output_Test
Target: Arduino Uno
Author: John D. Nash
Date_Written: 19 May 2012
Last_Update: 19 May 2012
(more comments go here -- cut to save space)
*/

void setup() {
 int i;
 for(i=0;i<14;i++){
 pinMode(i, OUTPUT);
 }
}

void loop() {
 const int iDelay = 50; // milliseconds delay
 int i;

 for(i=0;i<7;i++){
 digitalWrite(i, HIGH); // set the LED on
 digitalWrite(13-i, HIGH);// set the LED on
 delay(iDelay); // wait for a second
 digitalWrite(i, LOW); // set the LED off
 digitalWrite(13-i, LOW); // set the LED off
 delay(iDelay); // wait for a second
 }

 for(i=5;i>0;i--){
 digitalWrite(i, HIGH); // set the LED on
 digitalWrite(13-i, HIGH);// set the LED on
 delay(iDelay); // wait for a second
 digitalWrite(i, LOW); // set the LED off
 digitalWrite(13-i, LOW); // set the LED off
 delay(iDelay); // wait for a second
 }

}
Another very nice microcontroller is any of the Texas Instruments LaunchPad series. LaunchPads are available directly from Texas Instruments and their price includes all costs, even shipping, USB  cable, and usually a few extra microcontroller chips so you can try different configurations. They are from TI and $9.99 is much less than $25 or $35 to buy an Arduino or Raspberry PI. Code to do the same thing on the LaunchPad for MSP430 chips is:
/*
Program: TI_Knight_Rider_Digital_Output_Test
Target: MSP430 Series
Author: John D. Nash
Date_Written: 28 Jun 2014
Last_Update: 28 Jun 2014
(more comments go here -- cut to save space)
*/

void setup() {
 int i;
 for(i=2;i<16;i++){
 pinMode(i, OUTPUT);
 }
}

void loop() {
 const int iDelay = 50; // milliseconds delay
 int i;

 for(i=2;i<8;i++){
 digitalWrite(i, HIGH); // set the LED on
 digitalWrite(15-i+2, HIGH);// set the LED on
 delay(iDelay); // wait for a second
 digitalWrite(i, LOW); // set the LED off
 digitalWrite(15-i+2, LOW); // set the LED off
 delay(iDelay); // wait for a second
 }

 for(i=8;i>2;i--){
 digitalWrite(i, HIGH); // set the LED on
 digitalWrite(15-i+2, HIGH);// set the LED on
 delay(iDelay); // wait for a second
 digitalWrite(i, LOW); // set the LED off
 digitalWrite(15-i+2, LOW); // set the LED off
 delay(iDelay); // wait for a second
 }

}
The code is mostly identical: only the hardware addresses of the ports is different. Even the free tool to code and upload the program is almost identical. TI does have nicer tools too, some free, if you are interested.