Installing Ubuntu Oneiric Ocelot 11.10 usable for desktop class instruction.
As the current version of Ubuntu, October 2011 “v11.10 Oneiric Ocelot”, is published, it is intended for mobile devices rather than desktops and omits a few necessary features for classroom use. It can still be made usable. Follow these steps to install and configure it so that it is usable in the classroom. In particular we are concerned about Zoom and VMWare.
Installing Ocelot
- Download the torrent for the version you want from http://www.ubuntu.com/download/ubuntu/alternative-download#bt or if you must, use the conventional FTP or HTTP download from http://www.ubuntu.com/download/ubuntu/download. The 32 bit is said to be recommended. It will take a few minutes by bit-torrent and a few times longer for a straight download – in my experience the bit torrent is noticeably faster.
- Make an install USB memory stick. The stick must be big enough to hold the system – look at the FILE SIZE for the .ISO file you just brought in. If you have an older version of Ubuntu and have been waiting until you figured out how to load the new version without loosing necessary functionality, then go to your SYSTEM / ADMINISTRATION / STARTUP DISK CREATOR. IF all you have is a version of Microsoft Windows, you will need a program which can burn an .ISO file directly to USB memory stick or CD / DVD. One possibility is Wubi, which you can get from http://www.ubuntu.com/download/ubuntu/windows-installer.
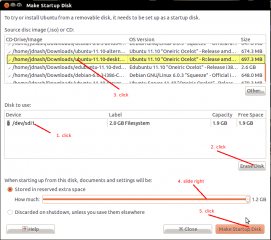
- Insert your memory stick into a USB slot on your computer, Erase it, click the .ISO you want to burn to stick, allocate some storage space on the stick to save files in case you want it later, and click the Make Startup Disk button. Now go do something else for a while.
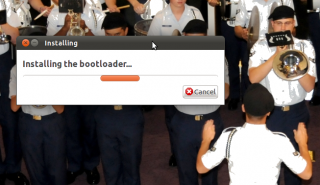


- The USB memory Stick should already be unmounted and the icon gone from the desktop. Remove it from the computer you used to make it bootable and insert it into the computer onto which you want to install a workable copy of Ubuntu 11.10.
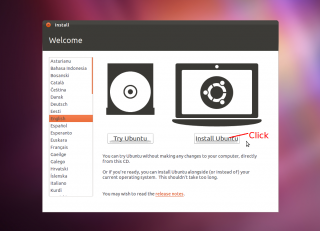
- Turn on the computer and install the Ubuntu – follow the various screens through. Click Install Ubuntu.
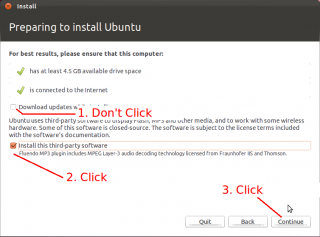
- Click Install third-party software so flash and other necessary aides are installed. Don’t click Download updates while installing as it tends to slow things down and you can do this later without wasting your time.
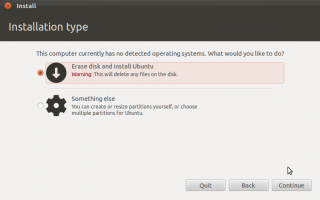
- There will be several possible Installation types available. If you know what you are doing, I recommend that you click Something Else and manually set up your partitions. If you have never done this before, I recommend that you click the option to install Ubuntu along side (Dual Boot) Windows, or if nothing is on your disk yet, then you will see only the two choices shown in the graphic and I recommend that you choose Erase disk and install Ubuntu.WARNING: Unless you intend to wipe out your whole hard disk and start over, don’t pick the Erase Disk option! It will clean off everything from the hard disk and install only Ocelot.
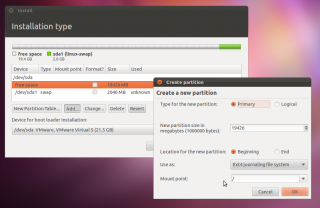
- We’ll assume that you know what you are doing and wish to manually specify your partitions. I use this setup: you might prefer a different one. I prefer to use all Primary Partitions (only 4 are permitted) rather than logical as I believe it eliminates a few extra steps interpreting the partition table each disk access. I make one partition for the root and another for the swap. I set the swap size at two times the amount of RAM in the machine. This machine has 1GB of RAM so I specify a 2GB Swap partition. Notice these choice are all drop-down-combo-list-boxes so you just need to click. I specify the Swap partition first with 2048MB (2GB) space and click the End button so it is created at the end of the disk: after that I specify the root “/” partition and it saves me needing to figure out exactly how much space to tell it.
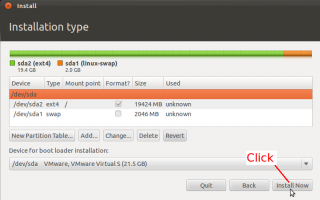
- Next click Install Now. Ubuntu will start installing files and at the same time ask you for more information that it needs, such as your time zone (click on the world map) and preferred keyboard layout (English).
- Time Zone fills in possibilities as you type the name of your city. Keyboard selection usually guesses correctly so you will probably just press Continue.
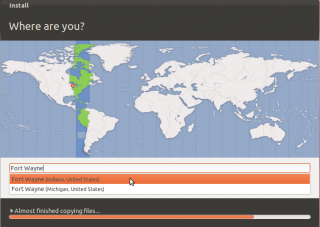
- Enter a user name. This user will also be an Administrator – that is this user can shell to root with SUDO <command> where as other users cannot unless you create them this way. Ubuntu will generate a random garbage password for the root account, which we will fix later. I don’t know any Linux Admins who actually enjoy typing SUDO <command> and then entering their password when they have real work to do from the command line. Our first SUDO command will be “sudo passwd root”. Problem solved. IF you are installing Ocelot along side Windows, then you will see a screen asking if you want to import
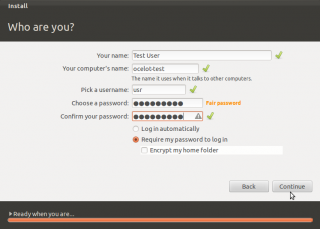
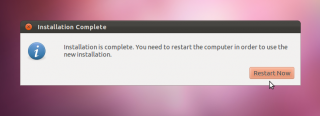
- In this virtual machine, the installation actually finished before I could copy/paste the screen shots into this document – it is fairly fast. Click Restart Computer and you are ready for the next part.
Configuring Ocelot for usefulness.
Before refining the configuration on the installation we need to do two simple things: 1. get a real password for root so that we do not need to go through the nonsense of using SUDO, and 2. update existing programs to their most recent versions, without the process aborting due to errors.
- Either press CTRL-ALT-T to open a terminal window or use CTRL-ALT-F2 to start an additional login session. CTRL-ALT-F1 through CTRL-ALT-F7 will each open a session: CTRL-ALT-F1 is the original session used to boot and CTRL-ALT-F7 is the current X11 graphical session that most people use without knowing about sessions, so they are already being used right now, but CTRL-ALT-F2 isn’t being used yet so we can use it. An example of when this is handy is if you need to update the computer which will take some time (and you have better things to do with your time than stand there staring at a computer waiting) and people may walk up to it without your being present, just login to a new session using CTRL-ALT-F2 and start the update, then without waiting for it to finish switch back to the graphical session with CTRL-ALT-F7 and let the session running in CTRL-ALT-F2 finish it’s job behind the scenes. People walking up to the computer can use it without hurting anything so long as they do not reboot the computer: they will not even realize more is going on because they will not know how to switch sessions. Another way to do this even better (for example if you have several computers to configure at once) is to install the open ssh server and do them all in terminal windows on your office computer (one in each terminal window) instead of running from computer to computer in your lab. If you are starting a new session for this then you will need to login as you. If you choose to open a terminal window with CTRL-ALT-T then you will already be logged in as you.
- Enter the command “sudo passwd root”. Enter your password when prompted, then enter some memorable password for root and verify your typing by typing it again when asked.
- Shell to root by entering “su -” and enter the password for root when asked. Notice that is “su” a space and a dash, not just an “su”. If you are using a separate session you could also logout and then login as root. Doesn’t matter.
- If you would like to access this computer remotely, install the open ssh server program. Enter the command “apt-get install openssh-server”.
- Run “apt-get dist-upgrade” to upgrade with the parameter dist-upgrade. This version of the update command works without crashing: the graphical updater sometimes has problems if it cannot download the needed files. This update may take a while: you can come back later or continue to use the computer while you wait. Linux can do that safely.
Here is a sample of what the update looks like:
jdnash@dad:~$ su –
Password:
root@dad:~# apt-get dist-upgrade
Reading package lists… Done
Building dependency tree
Reading state information… Done
Calculating upgrade… Done
The following NEW packages will be installed:
linux-headers-3.0.0-16 linux-headers-3.0.0-16-generic linux-image-3.0.0-16-generic
The following packages will be upgraded:
at-spi2-core bamfdaemon brasero brasero-cdrkit brasero-common compiz compiz-core compiz-gnome
compiz-plugins-default firefox firefox-globalmenu firefox-gnome-support firefox-locale-en
gir1.2-atspi-2.0 gir1.2-gtk-3.0 libatspi2.0-0 libbamf0 libbamf3-0 libbrasero-media3-1 libdecoration0
libgail-3-0 libgail-3-common libgtk-3-0 libgtk-3-bin libgtk-3-common liblightdm-gobject-1-0
libnautilus-extension1 libpng12-0 lightdm linux-generic linux-headers-generic linux-image-generic
linux-libc-dev nautilus nautilus-data thunderbird thunderbird-globalmenu thunderbird-gnome-support
thunderbird-locale-en thunderbird-locale-en-gb thunderbird-locale-en-us update-manager
update-manager-core
43 upgraded, 3 newly installed, 0 to remove and 0 not upgraded.
Need to get 98.9 MB of archives.
After this operation, 252 MB of additional disk space will be used.
Do you want to continue [Y/n]?
Tell it Yes and go out for coffee. You could also be doing this remotely if you chose to install openssh-server. For example, in my lab I have 10 computers – eight for students, one for a class monitor, and one for the projector. I go to my office and open 10 windows, then shell into one lab computer with each window. I just line the windows up side by side on my screen and I can service them without needing to run helter-skelter to each computer. That lets me continue work in my office and it lets me keep better track of the process to be sure each computer does get updated correctly. Just use ifconfig in a terminal window on each remote computer or use the “Connection Information” property on the Network Status icon on the task bar, to learn its IP address. The “Connection Information” property is on the Network Status (right click) on the task bar, upper right corner of the screen beside the clock: it looks like an up and down arrow right beside the little speaker icon.

Enter the command “ssh xxxxxx” where the xxxxxx is the IP addy in a terminal window for each remote computer you want to configure.
jdnash@pops:~$ ssh 192.168.8.11
The authenticity of host ‘192.168.8.11 (192.168.8.11)’ can’t be established.
ECDSA key fingerprint is 8a:08:90:5c:78:df:da:07:b1:0c:39:4e:0e:d8:dc:6e.
Are you sure you want to continue connecting (yes/no)? yes
Warning: Permanently added ‘192.168.8.11’ (ECDSA) to the list of known hosts.
jdnash@192.168.8.11’s password:
Welcome to Ubuntu 11.10 (GNU/Linux 3.0.0-15-generic x86_64)* Documentation: https://help.ubuntu.com/
The programs included with the Ubuntu system are free software;
the exact distribution terms for each program are described in the
individual files in /usr/share/doc/*/copyright.Ubuntu comes with ABSOLUTELY NO WARRANTY, to the extent permitted by
applicable law.jdnash@dad:~$
You can read more about using ssh, for example specifying what login to use on the remote computer, by typing “man ssh” in a terminal window. In my opinion, ssh is also the best way to connect for file transfers using the graphical interface: on the Places menue select “Connect to Server”, enter the IP address of the computer and specify the SSH protocol in the “Service type” box. If you want the computer to stay in your files list, check the “Add bookmark” box too. The remote computer opens up as if it were just another hard disk on your desktop computer.

That mostly gets a basic Ubuntu Ocelot system up and marginally usable. More in Practical Ubuntu — Part 2.